Chapter 11: DIY Flynn-vention Guide
Build Kai’s Sneaky Zoo Motion Alarm!
Hey Flynn-ventor! Want to build the same motion alarm Kai used to catch the sneaky suspect at the zoo? With a cool kit and simple steps, you’ll be a real Flynn-ventor in no time. Ready? Let’s go!
🏗️ What Are We Building?
A motion alarm that BEEPS when something moves—just like Kai’s in the zoo story!
🧰 What You’ll Need (All in the Elegoo Super Starter Kit!)
🧠 Arduino Uno – The brain of your invention.
👀 PIR Motion Sensor – Watches for movement like robot eyes.
🔊 Buzzer – Makes loud beeps when something moves.
🌈 Jumper Wires – Colorful roads connecting parts.
🖥️ Laptop/Tablet – For coding magic.
Exact Parts You Will Use In Image Below From The Above Kit
💻 Step 1: Download the Arduino App
(Like installing a game on your computer!)
Go to Arduino’s Website:
Type www.arduino.cc into your browser.
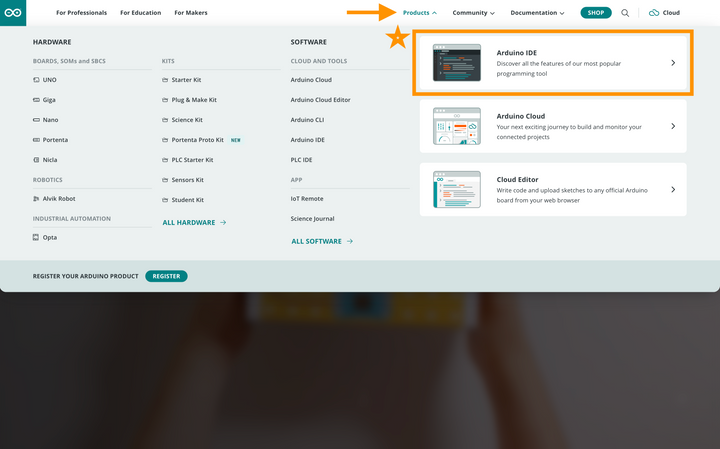
Click Products → Software → Arduino IDE. Download the latest version.
📸 Image: Screenshot of Arduino.cc download page with IDE button highlighted
Download for Your Computer:
Windows: Click Windows Installer.
Mac: Click Mac OS X.
Install the App:
Windows: Double-click the .exe file → I Agree → Next → Install.
Mac: Drag the Arduino icon to your Applications folder.
🔌 Step 2: Grab your Kit and Plug in Your Arduino Uno
(Like charging your phone!)
Use the USB Cable:
Plug the square end into the Arduino Uno.
Plug the flat end of the USB into your computer. Note: You may need an adapter for your computer.
📸 Image: Arduino Uno connected to laptop via USB
Check the Connection:
Open Arduino IDE.
Go to Tools → Board → Arduino Uno.
Go to Tools → Port → Select the COM/USB port (e.g., COM3).
🔁 Step 3: Test with a Blink!
(Make the Arduino say “Hello!”)
Open the Blink Example in the Arduino IDE Software:
Click File → Examples → Basics → Blink.
Upload the Code:
Click the → (Upload) button. The button is the arrow icon.
If the tiny LED on the Arduino blinks, you’re ready!
📸 Image: Close-up of Arduino Uno’s blinking LED
🧱 Step 4: Build the Circuit
(Like connecting Lego blocks!)
Open a New “Sketch” Window. Sketch is where you put in the code!
Open New Sketch:
Click File → New Sketch.
Connect the Motion Sensor using the Jumper Wires (Note: the Jumper Wires in the kit are combined and you can pull them apart):
📸 Image: Motion Sensor
Red wire → Arduino Uno’s “+” 5V column (power).
Black wire → Arduino Uno’s “-” GND column (ground).
Yellow wire → Pin 7 on the Arduino.
*Note: Pay attention to the wire location on the sensor. The yellow wire for Pin 7 is in the middle. Power is on the right and GND is on the left. If the buzzer doesn't beep after you wire, flip the wires around and try again. Color of wire is not important, but red usually always means Power and black usually always means GND.
📸 Image: Buzzer
Add the Buzzer: (Note: there are two buzzers in the Elegoo Super Starter Kit. One is Passive and one is Active. Use the Active. The differences are in the image above.
Long leg (positive) → Pin 8 on the Arduino.
Short leg (negative) → Arduino Uno’s “-” column.
📸 Image: Color-coded circuit diagram (Note: This wiring is specific to the motion sensor in the Elegoo Super Starter Kit.)
💡 Pro Tip: Ask an adult to double-check your wires!
👩💻 Step 5: Add the Secret Code
(Copy-paste or Type in Kai’s code!)
Copy code starting at word void below manually or use the "Copy Code" button below for automatic copy.
End copy of code at the last “}” curly bracket above.
Paste the Code: Copy or Type the above into Arduino IDE. Pay attention to the format and spacing.
Upload: Click the arrow icon → (Upload). Wait for “Done uploading!”
📸 Image: Screenshot of Arduino IDE with code pasted
You can setup a TinkerCad account and wire a virtual Arduino circuit board with all of the parts shown if you don't have the physical product.
The image below is what that looks like.
🧪 Step 6: Test Your Alarm!
Power Up: Unplug the USB and connect a 9V battery (kit includes a connector).
Wave Your Hand: If the buzzer screams like a Flaimingo, YOU DID IT!
Hide It: Place it under your bed or near your door to catch sneaky siblings!
🧰 Troubleshooting Tips
No Beeps? Check if wires are fully plugged in (push gently!). Check wiring of PIR sensor.
Code Won’t Upload? Ensure you selected Arduino Uno and the correct port.
Sensor Too Sensitive? Adjust the orange dial on the PIR sensor.
🎉 You did it, Flynn-ventor!
Now add lights, secret signals, or even hide it!
Be creative and build your next invention adventure!
💬 From Kai:
“Every great inventor starts with one circuit. Keep creating!”
📦 Get Your Kit:
Elegoo Super Starter Kit on Amazon by clicking
🛠️ Next Book’s DIY?
Get ready to find out by reading Book Two!
📘 Glossary:
Microcontroller: The brain of your project.
Buzzer: Makes sound when triggered.
Motion Sensor: Detects movement nearby.
Breadboard: Holds your parts in place.
Jumper Wires: Wires that connect everything.
Coding: Commands that tell the robot what to do.


void setup() {
pinMode(7, INPUT); // PIR sensor eyes
pinMode(8, OUTPUT); // Buzzer
}
void loop() {
if (digitalRead(7) == HIGH) { // If motion detected...
tone(8, 1000); // BEEP like a startled monkey!
delay(1000);
noTone(8); // Stop
}
}


